Tuesday, September 13, 2016

RE-MODELING: BEFORE & AFTER AGAIN, My 1st House

My first house is on the market again.  The couple who bought it from us have decided to move and the photos of all the changes they made to the house prompted this entry.

One of my first blog entries was RE-modeling: my first home  about the changes we had made to our 1st home from the time we bought it in 1997 to when we put it on the market in 2010.  I brought up there that I felt I had gotten into a rut with our first home's style.  We hadn't made any updates or changes for several years before we sold and at the time of writing that entry, I felt its style had become dated and a bit too "old lady-ish,"  Seeing the changes the new owners made only confirmed I was right.  Everything they changed has made the house seem younger and fresher.  


FACE LIFT.   The new owners didn't change the facade that much.  They took down a metal and stone fence in the front,  painted the house a grayer green color, replaced the grass with another variety, added some white flower beds, an American flag/pole, and fenced in a side yard we had abandoned to our neighbor's use. They also changed the windows from the original single pane sash windows to more modern ones.  But, I promise the changes get more dramatic.

NOTHING MAJOR YET.  In the living room, the new owner changed the paint color to a more masculine neutral color, removed the antique chandelier, added recessed lights and removed a vintage gas faux fireplace to add in white storage casework shelving.

BYE BYE WALL. Here's where the changes become more dramatic.  The new owners took down a solid wall separating the kitchen from the dining room and replaced it with a kitchen peninsula/bar.    They also replaced the French Country blue & yellow color scheme for beige, white & dark wood.
FEELING BIGGER WITHOUT ADDING ANY SQUARE FOOTAGE.   Taking down the wall had the effect of making the kitchen space look and feel bigger without adding any actual square footage.  We had considered taking down the wall ourselves, but we liked the separation between the dining and kitchen space.  Even now, it's hard for me to let that inclination for the old, more formal style of separating living spaces totally go, but looking at what the new owners did, I think it looks great & very modern.  
STEALING SPACE FROM 2 CLOSETS.  The owners got rid of the laundry nook we hid as a bar space next to the refrigerator and then took a small closet space from the guest room to have room for commercial grade appliances and more storage.   Back in 2002, we had an architect draw up addition plans for this house and he suggested taking over the closet from the guestroom & the laundry niche like this, but we were also going to add a laundry room to the house in those plans.  My husband and I love how this turned out, but we can't spot any added square footage so we're wondering where they placed their laundry machines?  We are a bit curious about it.  
ANOTHER VIEW.  The new owners added a glass door to separate the front of the house from the sunroom in the back. 

BUSY VS. SIMPLE.   I got the black & white toile I used in the bedroom back in the late 90s after we moved in and I kept it until we sold the house.  To be honest, I still like the pattern, but I also now recognize how busy it is, especially on the curtains & the bed set.  I appreciate the appeal of the simple, strong white linens and furnishings against a neutral wall that the new owners have.  It is one of the ways the house feels so much younger now.

French Country Antique vs. Clean & Modern. I never really liked this pink in our daughter's bedroom, but even taking the color out of it, our old furniture & the window treatments seem so busy.  Even with more furniture taking up space in the bedroom now, it feels cleaner because they simplified the color scheme & the furniture.  

NOT A LOT OF CHANGES HERE.  They painted the cabinet a lighter color, removed a mirrored medicine cabinet and replaced it with regular mirror & 2 scones. 

Small changes, big impact.  In my entry, RE-modeling: my first home I talked about updating the hall bathroom from the version we purchased in 1997 to the green and white version we turned over to the new owners.  For the most part, the bathroom stayed very similar to how we left it.  The main 2 changes are the new paint color on the walls and the mirrored medicine cabinet over the sink.  There is another very subtle change.  They replaced the traditional sink faucet set with hot and cold labeled handles with a modern set with a curved faucet. 

From traditional to modern, mostly achieved through a change in color palette.
GUEST ROOM.  Aside from color, the big change is the small closet that was in the corner of the room is now gone & the space has been given to the kitchen.

CEILING, FLOOR, PALETTE.    The sunroom had light beige 12x12 tile floor when we owned it however, we also had 2 very large sisal rugs on both halves so not much of the tile floor showed. Our realtor asked us to pull them up so people could see the floors, but we brought in a smaller rug on one side because the floor just seemed too cold without them to me.  The new owners have replaced the tile with wood planks painted a glossy grayish blue.   It's a really fun change.  I wish I had tried it when we had the house.  They also added white beadboard on the ceilings and took down the curtains for a cleaner look.  I always loved our sunroom, so I am crazy about the white and grayish blue color scheme they have going.
A DIFFERENT VIEW.
BYE BYE DECK, HELLO CONCRETE PADS & PATHWAYS. The new owners traded out a deck for a  couple concrete pads & a pathway.  They also took out several large shrubs & a small tree to put in a traditional style lampost in the backyard.

I greatly enjoyed seeing all the changes the new owners made to our old house.  It's obvious the house has been well cared for and appreciated.   Hopefully, it will make a happy home for the next owners.  

WRITTEN BY ELDAROSE

Friday, August 7, 2015

RE-VEAL: MOM'S BIG 80TH BIRTHDAY BASH

MOM'S 80TH BIRTHDAY BASH
It's been years since we did our planning post on MOM'S 80TH USING MEMORY DECOR and in the interim, I've posted about my Father-in-Law's 80th Birthday Party HERE  and we covered several other special events Reba did.  This particular party just had a LOT of material to cover, and maybe the post was getting too ambitious (I tried to add a video clip from the party CD before realizing it wasn't needed) so here, finally, is our mom's party post.

THE INVITATION.  Reba came up with the idea of a pull out invitation and our sister, Elsa, & I loved the idea.  We found some great photos to capture our mom's life and Reba made an adorable poem for the invitation.  The cover photo of our mom as a child was captioned, "This Baby" and it opened to a picture of her in her 20s "Grew Up To Be This Lady", the facing page had a photo of our parent's wedding captioned "Who Married This Man", the pages opened to a wide shot of a family portrait captioned "And Had This Family" and the last photo was a recent portrait captioned "Now This Baby is 80!" 

ANOTHER  VIEW OF THE INVITATION.  If you want to do this type of invitation, I will admit it was a bit of a project. We had to edit the photos to make them high quality enough for the invitation, and change their size. We even had to photoshop in our nephew who missed the last family portrait to include everyone.  The photoshop worked great and no one noticed the difference, but it was another step.  We also had to try out different fonts and we didn't do this ourselves. Reba had a local advertising company do the layout, do mockups and print the final invitations.  Even so, there were multiple drafts before the invitation was just right.  I know there are tons of talented DIY crafters who could make this invitation, but I want to warn you the multiple pages do make it harder than a typical pull out.  I will say the guests RAVED about the invitation.  We got several phone calls of admiration and my mother thought it was very clever.  So, for us, it was worth the effort and time. 
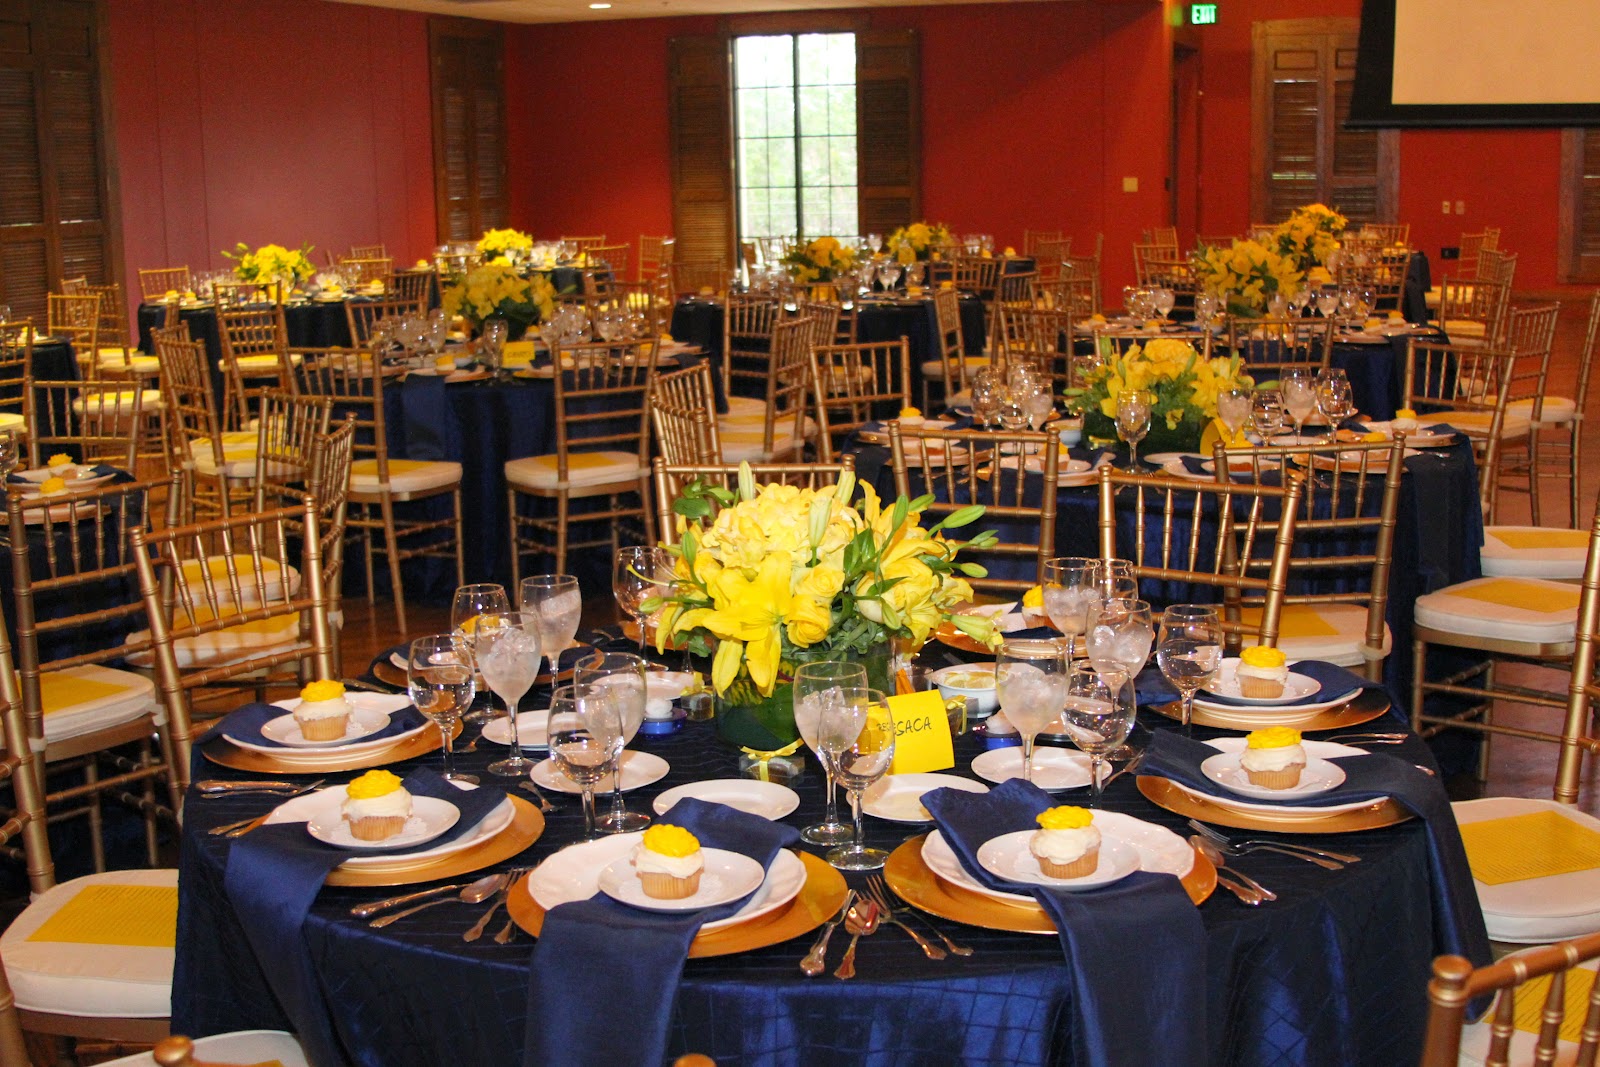
THE GUEST OF HONOR TABLE.  The color scheme for the party was cobalt blue and yellow.  We discussed selecting it HERE This color combination seemed fitting for several reasons.  They were the colors our mom used for her 2 local election campaigns and then, we adopted them to advertise our family business.  Additionally, my mother's favorite flowers are yellow roses and we live in Texas where outstanding women are sometimes called "yellow roses of Texas."  It just seemed right.  The rented tablecloths and napkins were blue. The silverware was provided by the caterer. The plate chargers were gold.  For this table, Reba used our mom's blue and gold china, Noritake Vienna & her own cobalt blue goblets.   Small cobalt blue votive candle holders were placed around the yellow rose centerpiece.  The crystal vase for the centerpiece was also Reba's.   At each place setting, a cupcake with a yellow rose was placed.  The tables cards were named after streets where our mother lived or from neighborhood streets.  The table & gold chairs were rented locally.
ANOTHER VIEW.  In this photo, you can see Reba left a Proust Questionnaire for each guest to give them an activity while they waited. If you'd like a similar activity, I'd suggest a questionnaire about the honoree's life and make it a whole group game.   
SEAT OF HONOR.  The caterer suggested a bouquet of flowers and a sash to distinguish our mom's chair and I thought it was a fantastic idea. 

THE GUEST TABLES.  These had the same tablecloths, napkins, flatware, plate chargers, votive candle holders & yellow rose cupcakes as the guest of honor's table.   White scalloped plates and clear goblets from the caterer were used instead of family china & goblets and the centerpieces had yellow lillies instead of roses.

THE MEAL.  We served salad, ceviche and Mexican food for dinner.  We knew we were going to  have Mariachis play at the end, so we thought it was a good choice that most everyone would like.


RECEPTION TABLE. When guests arrived, they were directed to this table to find their place cards and table assignment.  In lieu of gifts, we asked guests to write a note to our mother.  Reba brought a blue & white ceramic bowl on a gold base for the guests to leave their notes and placed one of our mother's blue & white ceramic elephants beside it.  Our mother LOVES elephants which she has collected for good luck my whole life. It was a small touch, but the party guests were my mother's closest friends and they would likely know the personal significance of the elephant.  I thought it was particularly clever of Reba to do that.  Beside the bowl, I placed our mother's initials decoupaged in black and white photos.

MEMORY DECOR PROJECT #1. I made a collage in the shape my mom's age.  3 years ago when we had the party, this was still a pretty new idea.  I picked great black & white photos and got to it. I used 2 large gold frames & backed them in blue velvet.   My mom and her guests enjoyed seeing looking over her old photos.
WE GONNA NEED A BIGGER BOWL & MEMORY DECOR PROJECT #2.   We didn't expect so many notes, but guests wrote the most AMAZING letters to my mom.  For several days after the party, my mom was still reading them and asking us to let her read passages aloud to us.  Then, my mother would call people to thank them for what they had written and several of these phone calls ended in joyful tears.  It really extended the afterglow of the celebration.  Months later, my mom came upon her stash of letters and began reading through them again and then, stopping to talk to me about whatever was written.  This has happened at least 3 times with the two of us since the party and I don't even live in the same town anymore.  She truly treasures them.  The decoupaged letters are my mom's initials and some of her friends just call her by them.   I was expecting them to stand up, but the balance seemed off once they were decoupaged so I had to lay them on the table.  In hindsight, I probably would have chosen bigger letters to make a bigger impact or skipped this project. 

FINDING THEIR SEAT. Our sister, Elsa, helped my mom's friends find their place cards.  It wasn't a big party. It was mostly close family and friends, but my mom wanted to include a few more people who help make her life special and we were lucky quite a few were able to join us. She had the ladies who have done her hair and nails for many years, her physical therapist, priests who have moved away, friends from grade school and cousins she hadn't seen in many years all there for the special night.
PRAYER BEFORE THE DINNER.
VIDEO MESSAGES.  While guests were finishing dinner, our sister, Elsa, introduced a special video we had made for the party.  My father, my siblings, our other halves, our kids and a few close friends all sat for interviews with a videographer before the party.  We were asked for a funny story, a heartfelt story and a birthday message for our mother.  There was a LOT of footage with all those people, so only the funny messages were used.  All the raw footage was saved on a CD for my mom to enjoy later.  It was funny and highly emotional to see what we all had to say about Mom.  For my father-in-law's 80th birthday party, my niece made a music video with photos and I thought that added a lot to the party.  If you're planning a big special party, I would strongly suggest trying to make something like this.  It was definitely a highlight of the night.  I saw both my parents wiping their eyes while watching it.  For our father's birthday later that year, we made him a tribute video as well. 
THE TOAST.  After the video, our sister, Elsa, lead the toast to our mother.
THE LADY OF THE  HOUR SPEAKS.  After the toast, my mom thanked everyone for attending and commented about how blessed she has been.  

OUR PARENTS SMILING AT THE PARTY.  They will be married 60 YEARS this December!
Blowing out the candles on the birthday cake with the grandkids and a surprise mariachi band.  The cake was a large white sheet cake with yellow roses and blue ribbon icing.  With all the other details to cover, the cake was kept pretty straightforward. 


LOTS OF PICTURE TAKING WITH SPECIAL GUESTS.

LOTS AND LOTS OF PICTURE TAKING.  LOL.

ENDING ON A HAPPY NOTE.  As the last guests left, our family stayed to take photos.  Reba was writing a check to the bartenders when our other sister, Elsa, started a dancing line.  When the party was over, I told Reba she had done a great job.  Everything was as I hoped it would be. It was the wonderful 80th birthday party that our wonderful mom deserved.

WRITTEN BY ELDAROSE

Friday, February 13, 2015

RE-CEIVING GUESTS: A TEEN GIRL VALENTINE'S PARTY


THE RIGHT KIND OF FUN. I have a teenage daughter.  It's as scary as people claim.  Just as my daughter has to face the most challenging situations of her young life, I can sense my loss of influence with her and the increased importance of her friends' opinions. To avoid becoming a non-entity in her life and to get to know her friends better, I like to host teenage versions of playdates at our house.  I want to show her that your social life doesn't have to revolve around boys to be fun and to encourage her to invest in her friendships.  I strive to come up with activities the girls will think are "cool."  Left alone, the girls would all sit around on their cell phones lost in music videos, video games and emails instead of talking and interacting with each other. I've seen it way too often.  I was happy with our Valentine's party last weekend so I'm sharing it with you here. 

$2 CRAFT PROJECT. All the rectangular frames above, came from the Dollar Store.  I bought a couple pink and blue striped scrapbook pages and some pink ribbon on 50% sale.  Since I'm crafty, I already had navy blue and gold paint and some paper heart shaped doilies. The scrapbook pages each did multiple frames and hearts and the ribbon could have done more frames. The Love card is also from the Dollar Store. I just taped it to the page. Totaling up all the supplies, the finished frames were less than $2 each and I could have made many more so I consider them a good craft activity, but I  decided to go with glitter cups, a banner and baking this year.  Maybe I'll do this one with the girls next year.

JUST ANOTHER VIEW OF THE FRAMES

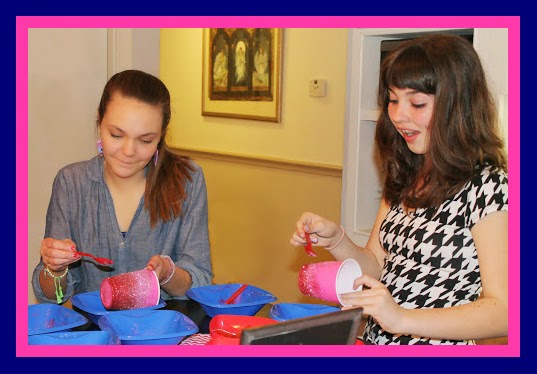
OMBRE GLITTER CUPS. So easy, so pretty.  A new trend on Pinterest is glitter cups.  You apply spray adhesive to plastic cups or champagne  bottles and then sprinkle glitter on it.  It adds sparkle and glitz to any celebration and it's super easy.  I've seen it done a lot with gold & pink glitter on champagne bottles or clear plastic champagne cups, but I decided to give the girls pink solo cups and give them a variety of glitter colors (blues & pink hues) to make ombre effects if they wanted since ombre is so in right now. You can see the girls started with red on the bottom and then chose lighter shades of glitter for each subsequent layer.


CREATIVE EXPRESSION.   I'm a very orderly crafter.  I like projects to come out picture perfect, but for a gathering like this, it's the creative expression that's important, so I let the girls go crazy with the glitter and do whatever they want.  No matter what they did, it looked pretty and festive. It was basically a fail-proof craft.  I had some glitter already, but FYI, Dollar Tree has small packets of 4 glitter colors as a set in different hues.  I picked up a few of those in pink and blue for this activity.

A YOUNG VIBE. I chose navy blue and bubble gum pink over traditional red and white to better fit the age range.  It started because I had pink chevron heart place mats, but I went with navy and white greek pattern material for the table cover since that is so in right now.  My daughter has a lot of pink in her room, so I brought out some poodle ornaments we got her years ago and a pink Eiffel tower to use as a centerpiece. Then, I added some hot pink balloons that I got at the dollar store. If I didn't have the place mats, I could have used pink butcher paper to make large pink hearts for each place setting. It was more about the bright colors than anything else. 
LE MENU.  This was an easy meal. I made heart shaped pasta they had at the grocery store with cheese sauce, a green salad, some bread from a Pillsbury roll and served pink lemonade.  Teen girls aren't expecting much for party food and this was cute and filling. Heart shaped pizzas was my back up plan.  After dinner, the girls baked their own cupcakes and cookies and they decorated them. Teen girls are old enough to bake without much supervision and many enjoy it.  Those who don't, can watch and visit with the rest.  Since I used mostly plastic and paper plates, cups, napkins and cutlery,  I hardly had any clean up.  I did like the pink plastic heart shaped bowls I found at the grocery store for $1 each on sale. I thought they made the table setting more festive.


PINK & BLUE BANNER.  I had blue and pink butcher block paper from a teacher's supply store and made a large banner. My daughter helped making a few extra hearts for the banner.  If the girls got bored, I was going to get them to do a few more for me.  I did give them some pink and blue crepe paper to decorate the banner and they made some streamers for it.  They thought it came out pretty so we took a picture.  Very inexpensive activity and it kept them off their cell phones. After dinner, they baked their cupcakes and played Just Dance so their cells pretty much stayed put away as I hoped they would.


ANOTHER VIEW OF THE BANNER.
KEY TO MY HEART.  When I put this card out as a display, I noticed the key theme and found an old key, spray painted it gold and put a ribbon on it to add to the display.  Afterwards, I realized this could be another craft for the girls. I have lots of old keys that don't go to anything.   I could have had the girls spray paint them gold and hung them from ribbon to make them into necklaces. I would be recycling. If I didn't have the keys, I could have used florist wire, shaped it into a heart and had the girls spray paint them to make them into pendants to go on ribbons to make necklaces.  I didn't need the activity this year, but I'm storing the idea away for next.

Hope you have a happy St. Valentine's Day!

WRITTEN BY ELDAROSE

FYI, SOME OLDER VALENTINE'S DAY POSTS

EASY ROMANCING YOUR SPOUSE IDEAS HERE

REBA'S ROMANTIC TABLE HERE

REBA'S ST. VALENTINE'S DAY LUNCH TABLE HERE

REBA'S 2012 ST. VALENTINE'S DAY TABLE HERE