|
| Before: Cottage charmed - my first sight of the 1940s cottage that would become our first home. It didn't have much curb appeal. It didn't even have a curb. (The neighborhood predated those kinds of building codes) But, I saw potential. | |
 |
| After: New paint (Benjamin Moore Texas Sage), shutters, lanterns, mailbox, roof & added portico, stone steps, fence & landscaping |
|
|
 |
| Close up of our new front entry. Black paint, black iron railings, new stone covered steps. The steps before were cement and there were no railings. In the corner, you can see a glimpes of the black iron standing mailbox we used to replace the old white metal one that hung beside the front door originally. Photo credit: Farrah Welch. |
This blog entry represents a major chapter in my life. I have just moved to a new house (which will probably be the focus of many of my blog posts), but for 14 years I lived in a cottage in Old West Austin. For over a year before my husband and I bought our first house, I spent every weekend stalking the Bryker Woods neighborhood in West Austin looking for homes going on the market. We wanted to live close to the middle of the city and, at that time, there was a major real estate boom going on in Austin, so asking for a central location was going to up the price tag. Our realtor had tried to persuade me into looking at other neighborhoods, but I was determined to live in Bryker Woods. While driving around town, I had noticed neighbors there were often out in their yards talking to each other with their kids playing together and I was charmed by the display of old fashioned community since I had grown up in a small town myself. I liked the Americana feel to the neighborhood so I accepted I would likely have to buy a fixer upper and I got excited about the idea.
I think there are three types of people: those people who get a thrill and pride out of Do It Yourself projects, those people who like to come up with the ideas but don't want to do anything hands on, and those people who prefer to just sit back and enjoy what someone else has created. I am in the first category. I have multiple glue guns, a sander, a large assortment of painting supplies, a small tool box and a saw. Maybe I got too much praise as a kid whenever I declared "I made this" because saying the phrase still brings me joy. Now, I have very limited skills, so I have to hire folks to do most of my projects, but part of why I created this blog is because I have loved reading all the DIY projects other bloggers have done. I like dreaming about being able to do so much more than I can now. I would run out of time to do everything I could imagine because I love reinventing something old via remodeling, but oh, there is the mess that comes with it.....
 |
| My husband inspecting the new portico over our front door. We hired this very conscientious carpenter, Vince, to do the portico for us. He worked on it for several weeks. There is no way he made money on the job. He could have done it faster and moved on to another job, but he really wanted to do a good job on it. I know he was proud of his work. The day after he finished, we saw him driving by with his wife. He wanted to show her what he had made. I thought that was really nice. |
 |
| Before the painters arrived, we had to replace a lot of the clapboard siding damaged by sun & moisture exposure |
 |
| Before: The hall bathroom had a marbelized vanity top, an old radiator & dingy ceramic tiles. This photo was taken right before the remodel. When we first moved in, I got my husband to put up Laura Ashley toile wallpaper for me and I painted a continuation of the pattern from the walls on to the ceiling. I made matching beige buffalo check curtains for the window and under the vanity to try to make it cuter. The curtains are down here because this picture was taken right before the room was gutted. | | | | | | | | | | | | | | | | | | | | | | | | | | | | | | | | | | | | | | | | |
|
|
|
 |
| The messy middle: The insurance funds from a shower pan leak led to a whole room remodel. We kicked in extra money for upgrades but we didn't want to dramatically changed the style because at the time I was still really into the cottage look. |
 |
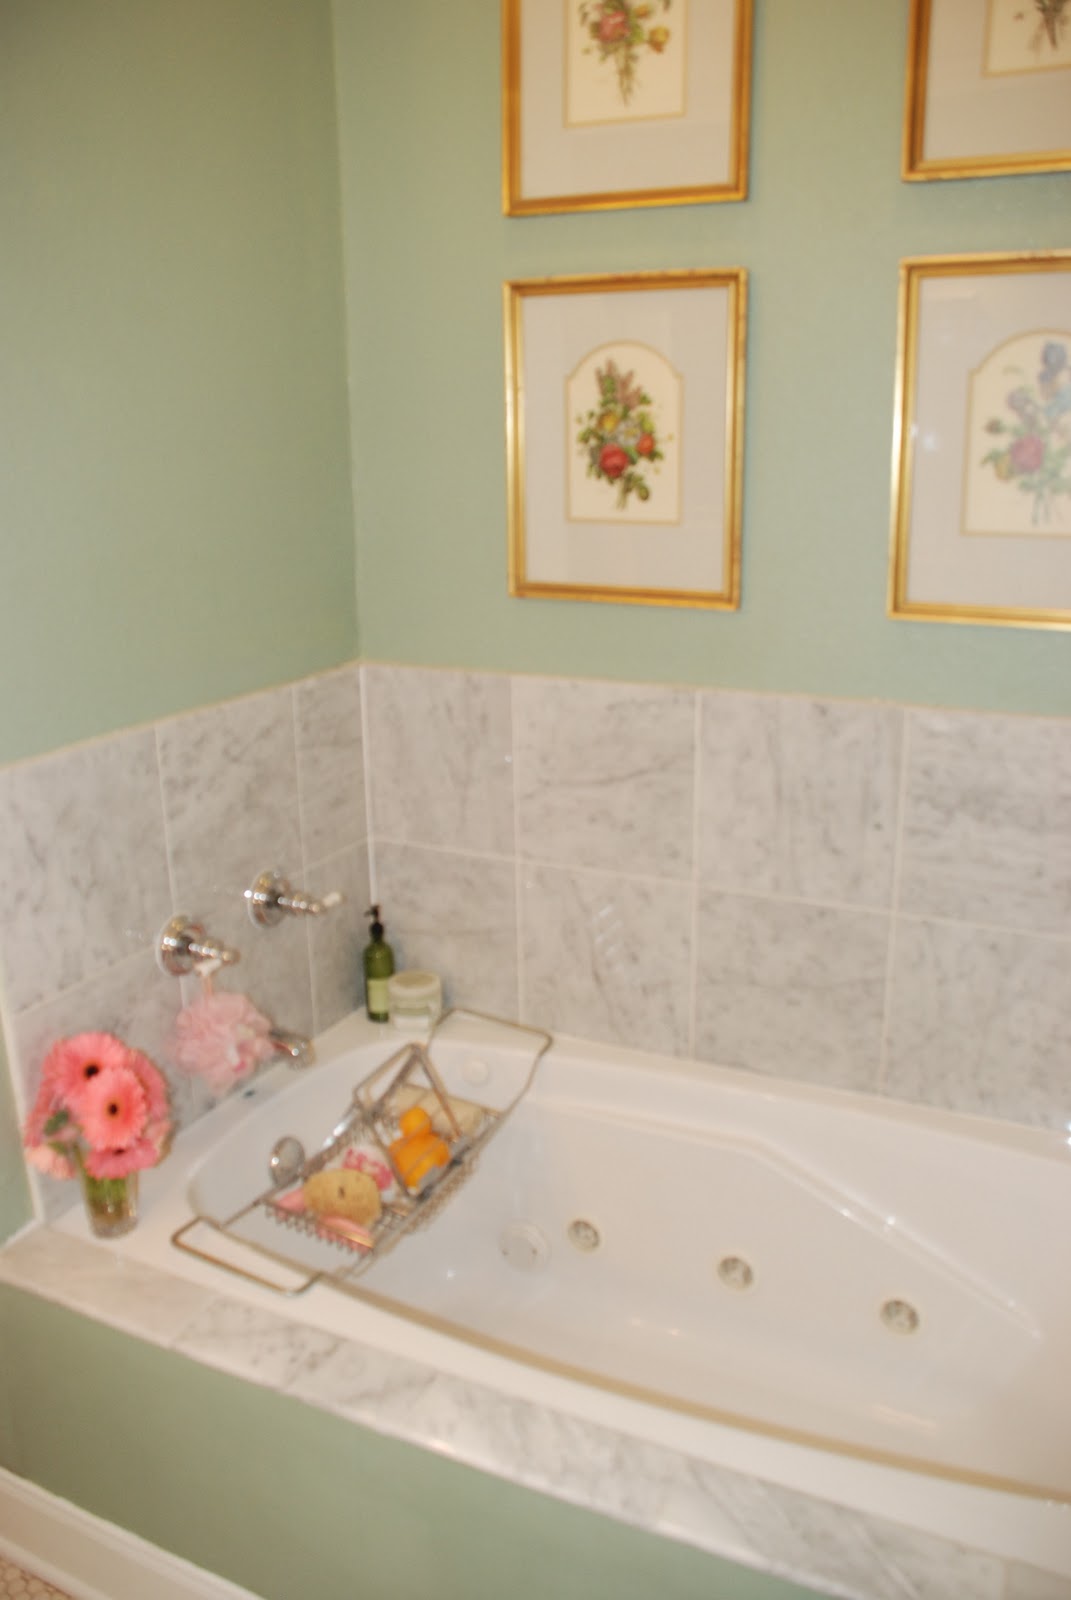
| After: White pedestal sink, carrera marble shower, a garden tub, a silver framed wall mirror & a green and white color scheme. |
 |
| Before: the separate shower entry was very narrow, so I hung a white linen curtain up, but I knew it was just temporary until I figured out what to do. |
 |
| After: The same view. The shower entry was widened and a glass door replaced the curtain. |
 |
| Before: pretty sad, huh? The white ceramic tile was very dingy and the faucet looked every bit its 55 years. |
 |
| After: We really enjoyed the garden tub. My husband has a bad back so he'd take really REALLY hot soaks after he'd work out to help him sleep better. And I enjoyed bubble baths a couple times a month. Some people don't use their whirlpool tubs, but we used ours often. |
 |
| Before: This picture is just about 5 months after we moved in. We had bought a French secretary at an antique shop, some chairs at an estate sale which we had reupholstered, but we still lacked curtains, different lighting and art. |
 |
| After: When we sold this house, I realized how little attention the living room had gotten. It was the room that welcomed people into our home, but once we got blue toile curtains, a new chandelier and some artwork, I stopped even thinking about it. It was "done" which I guess to me = forgotten. Selling the house made me look at all the rooms again and I found I no longer liked the style of this room. I hadn't paid attention and my style had become sorta "old lady-ish" unintentionally. There was no sign a relatively young couple lived here. There was no youthful spirit. Nothing hot, current and trendy. And while it isn't good to be a slave to trends, it is worse to no longer care. I was in a rut, and really that is what finally got me to leave this first home that I loved. Our neighbors were our friends and it was a great location, but we wanted more space and it was time to get excited about something new again. |
 |
| The Dining Room while we were selling our house. The French sideboard has snacks laid out for people coming to an open house. The dining room opened to the living room so they were both painted Martha Stewart Cornmeal. I put up Spode Blue Room Plates up on the wall and used a Waverly yellow & blue toile fabric (yes, toile again) to make cornice boards. |
 |
| Before: The 3rd bedroom/study was originally a dark green color. My husband likes dark colors so he wanted to keep it. I complained it felt like a tomb in there. I repainted it beige with a deeper brown with a rag off painting technique that my husband really liked. We kept it even when this room turned into a nursery. The house is on clay so eventually we got cracks and I couldn't match the paint so the room was painted a neutral color - Martha Stewart Travertine. |
 |
| After: The room when we sold it. The walls were painted Martha Stewart Travertine. I had painted the master bedroom that color and liked it so much that I painted the hall and this bedroom the same color. |
 |
| Our master bedroom when we sold the house. Sorry, I have no "before" picture but all we did to this room was paint it. The curtains are a black toile by Waverly called Country Life. It is very popular and I still like it. I wasn't kidding about toile being a recurring theme on this blog. |
 |
| The small master bathroom. Sorry about no "before" picture again, but I didn't know I would have a need for one when we had this house. When we moved in, this bath had no showerhead and the tile only went half way up the wall. We had a showerhead installed and retiled the shower with white subway tile all the way up the wall. Since there wasn't a side wall to support a shower curtain, I got a shower curtain rod that attaches to the ceiling from Renovator's online. The vinyl floor was redone in travertine tile. I painted the builder's grade wood vanity and medicine cabinet black and used silver pulls. The marbelized counter top was replaced with crema marbil. My sister-in-law, Yvonne, generously let me have a bargain faucet she found at Lowe's and had been storing for a possible bathroom remodel that she hadn't moved on yet. Yvonne and her husband put up the beadboard wainscotting and the chair molding for us. |
 |
| Before: We were putting in a new stainless steel microwave when I took this picture. We also made the counter black granite and took down a ladder that served as a pot rack left behind by the previous owner. The pot rack was useful, but as you can tell from this picture, it blocked out a lot of light. |
 |
| After: It was amazing how much more light we had by taking down the pot rack. We worried the black granite would make the kitchen seem darker, but it actually reflected light. |
 |
| I painted the kitchen door with blackboard paint. The niche is the laundry closet, but it was changed to pull double duty as a bar. The kitchen was small and we needed the extra counter space. The change was dramatic. Originally the laundry closet had bifold doors. Those were taken down. The closet walls had already been painted Martha Stewart Travertine so they just needed some touching up. My sister-in-law, Yvonne, installed the wood counter top and wood shelves for me. Yvonne is *CRAZY* handy and did a fantastic job. She painted them black. I made the curtain from a shower curtain. You can read more about this particular kitchen blackboard & laundry closet project HERE |
 |
| Another view of the galley kitchen. The appliances were originally all white, but we replaced them with stainless except for the Kitchenaid refrigerator we found for a steal at an estate sale. |
 |
| Normally this room had coir rugs on both sides, but our realtor suggested we pull up the rugs because buyers like to see floors/square footage when they tour homes. I didn't like how it looked but only one rug was put back when this picture was taken. |
 |
| This room went thru many, many changes in the time we owned the house. We ate, watched tv, played games, did work and basically lived 70% of the time in this room. When we moved in I painted it green. I painted it green 7 times. The whole room. Yes, it was nutty, but I love color and I don't mind painting and I wanted to get just the right shade. I experimented with glazes and mixing paints. My husband couldn't believe it when I told him I wanted to paint the room white 7 years later to go with a new beige & green scheme I wanted.. He worried it would lead to a repeat process, but it didn't. I painted it white and that was it until we sold it. |
 |
| This room didn't normally look like this. It is my daughter's room and usually had a lot more girly & pink accessories all over. The bed set was more juvenile. We had already removed a lot of wall art and a chandelier made of mini tea pots done by my sister-in-law, Yvonne. I told you she is crazy handy/crafty. I provided the tea pots and fabric and Yvonne had an old brass chandelier she painted white and drilled and wired the whole thing together. It turned out super cute and I will try to post a picture of it. The wall art is my daughter's baptismal gown framed. They say to decorate with what you love and I do love that gown. |
 |
| Originally the backdoor had concrete steps leading to a small landing of pavers. We hired a carpenter to add a deck and a pergola. We had the pergola painted white and the deck painted a dark green. We planted alongside the deck 3 different times and plants kept dying from lack of sunlight. After this picture was taken, we planted some Texas sage and lantana and that seemed to do well. Of course, we found the right plantings when we were leaving the house. Figures. |
Written by Eldarose
P.S. If you are viewing this entry at Xmas time, you can find our Christmas decor in our new house
HERE